Help Center
Interacting with a Case
Once you find the case that you would like to interact with, simply click on the hyperlink on the Case List/Case Type List. The system will take you to the Case page where you can add notes, attach the supported file, assign the case, etc.
Below are detail instructions on the functionalities behind each section and buttons on the Case page:

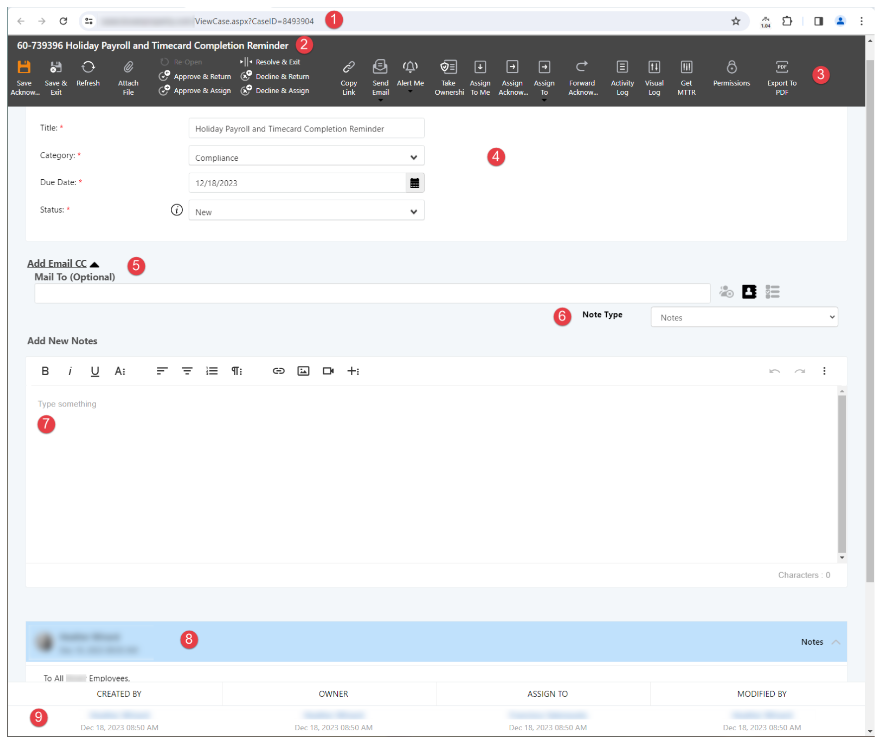
- The number on the URL indicates the unique Case ID for entire Cases Application.
- Provides Case Type ID – List ID and Title of the Case. Note: List ID is the unique identifier for the Case Type.
- Ribbon Buttons:
- Save [Case Type Name]: When this button is clicked, any changes on the meta data and Notes entered in 7 will be saved. Modify By field in 9 will also be updated with your name and the time the case is updated. The window will remain open.
- Save & Exit: Same as 3a but the Case page will close and take you back to the List page.
- Refresh: Refresh the case window. NOTE: Any changes not saved will be lost.
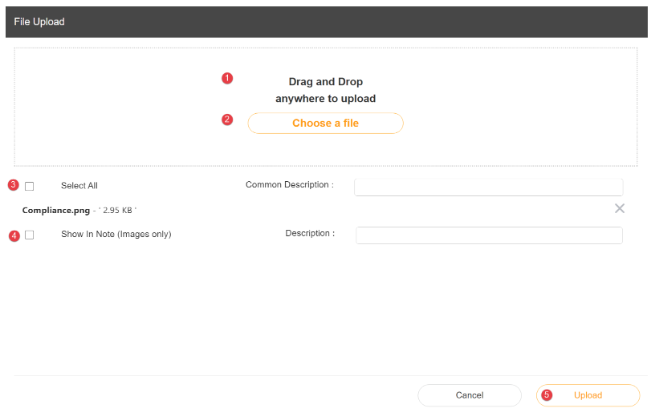
- Attached File: Attach a file to a Case. Once clicked, the Attached File screen will open:

- User can select one or more files and drag to the white area and drop the files. The dropped file(s) will be shown in the list.
- Click on Choose a file and select a file to be uploaded.
- This option allows a common Description noted in all the attachments to appear in notes.
- Individual note can be added to the Description.
- Click on Upload to upload the file(s) to the Case. The attachment(s) will be shown as a new Note.
- Re-Open: Re-open a closed case. NOTE: Option only available on closed cases.
- Approve & Return: Approve the case and return to the person who assigned it to you. This option will add “Approved” to the note.
- Approve & Assign: This option will add “Approve” to the note and allow you to assign the case to a user.
- Resolve & Exit: close the case once complete. Note: Closing a case does not erase it from the system. It will be moved to a Closed Case List.
- Decline & Return: Decline the case and return to the person who assigned it to you. This option will add “Declined” to the note.
- Decline & Assign: This option will add “Decline” to the note and allow you to assign the case to a user.
- Copy Link: Case-specific URL will appear and can be copied to the clipboard
- Send Email:
- E-mail a Link: This option will open a new Outlook message with the link to the case.
- E-mail me this [Case Type Name] will send you an email notification in the format of a case response.
- Alert Me:
- Set an alert on this [Case Type Name]: this option will subscribe you to the case. You will receive updates on the case as the notification is configured for your organization.
- Remove an alert on this [Case Type Name]: this option will remove you from the subscriber list. NOTE: this option will be enabled if you are a subscriber of the case.
- Take Ownership: click on this option will make you the owner of the case.
- Assign To Me: click on this option to assign the case to you.
- Assign [Case Type Name]: this option will take you to the assignment window to allow you to search for the user and assign the case to.
- Assign To: This option will provide you with a list of users who are associated with the case via: a role assignment or has worked with the case previously.
- Forward [Case Type Name]: this option allows you to forward the case to a user. It will take you to the screen to search for a user to forward the case to. Once chosen, that user will become the owner and the assignee of the case.
- Activity Log: provides the detail events happening to the case.
- Visual Log: provide the detail events happening to the case via a visual log.
- Get MTTR: view Mean Time to Resolution data.
- Permissions: if you have access to change the permission of the case, this option will allow you to grant or revoke user access to the case.
- Export to PDF: Export the case to a PDF file
- This section provides meta data about the case. Fields with red asterisks are required fields.
- Add Email CC allows you to send the note of the case to the email address(s) noted in this field. Click on the User Selection icon
 to search and add user(s) to receive the case notification. The user(s) in this field will receive a case link with the notes noted in Add New Notes (7) section. The user(s) will also be subscribed to the case to receive future notifications.
 - Note Types: choose appropriate Note Type.
- Add New Notes: provides new notes to the case.
- This section lists all prior notes in descending order.
- Provides user stamp information such as who created the case, owner of the case, assignee, last modified user and the date time.
